Beschädigte Wände können Ihr Zuhause sofort abgenutzt aussehen lassen – sei es durch Nagellöcher, Risse, Dellen oder abblätternde Farbe. Die gute Nachricht? Sie müssen keinen Fachmann beauftragen. Mit den richtigen Werkzeugen und Techniken können Sie Trockenbauwände schnell und kostengünstig reparieren.
In diesem Leitfaden erfahren Sie Schritt für Schritt, wie Sie Trockenbauwände reparieren und wie Sie mit einem kompletten Trockenbau-Reparaturset die einfachste Methode für glatte, langanhaltende Ergebnisse erzielen.
1. Warum Trockenbauwände beschädigt werden
Bevor Sie mit den Reparaturen beginnen, ist es hilfreich, die häufigsten Ursachen zu verstehen:
- Nagel- und Schraubenlöcher vom Aufhängen von Gegenständen
- Versehentliche Dellen oder Stöße
- Risse durch Setzen des Hauses
- Abblätternde oder wasserbeschädigte Oberflächen
- Kinderzeichnungen oder Wandflecken
Unabhängig vom Problem macht die Verwendung eines zuverlässigen Wandreparatursets den Prozess viel einfacher.
2. Was Sie für die Trockenbau-Reparatur benötigen
Um Wandschäden richtig zu beheben, benötigen Sie:
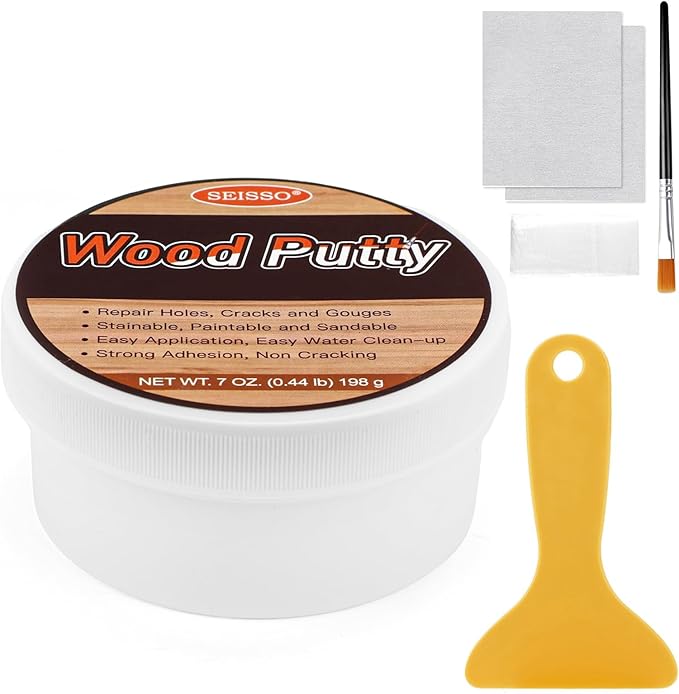
- Wandreparaturpaste (Spachtelmasse oder Fugenmasse)
- Trockenbau-Patch (für größere Löcher)
- Schaber oder Spachtel
- Schleifpapier zum Glätten
- Optional: Handschuhe und Reinigungstuch
Eine Komplettlösung wie das SEISSO Trockenbau-Reparaturset enthält all diese Essentials und spart Ihnen Zeit und Mühe.
3. Schritt-für-Schritt-Anleitung: So reparieren Sie Trockenbauwände
1). Beschädigten Bereich reinigen
Wischen Sie Staub, Schmutz oder lose Farbe weg. Eine saubere Oberfläche gewährleistet eine bessere Haftung.
2). Kleine Löcher und Risse reparieren
Für Nagellöcher, Kratzer oder kleinere Dellen:
- Wandreparaturpaste direkt auftragen
- Mit einem Schaber gleichmäßig glattstreichen
- Vollständig trocknen lassen (typischerweise etwa 4 Stunden)
Dies ist der schnellste Weg, um kleinere Wandunvollkommenheiten zu beheben.
3). Größere Löcher mit einem Patch reparieren
Für größere Risse oder Löcher:
- Einen Trockenbau-Reparaturpatch über den beschädigten Bereich anbringen
- Fest andrücken, um die selbstklebende Rückseite zu sichern
- Den Patch mit Spachtelmasse bedecken
- Mit einem Schaber glattstreichen
Diese Methode gewährleistet eine starke, nahtlose Reparatur.
4). Schleifen und Finish
Nach dem Trocknen:
- Die Oberfläche leicht schleifen, bis sie glatt ist
- Staub abwischen
- Bei Bedarf neu streichen
Sie erhalten eine saubere, professionell aussehende Wand.
4. Profi-Tipps für perfekte Ergebnisse
- Arbeiten Sie in einem gut belüfteten Raum, um das Trocknen zu beschleunigen
- Tragen Sie dünne Schichten anstelle von dicken auf, um glattere Oberflächen zu erzielen
- Schleifen Sie vorsichtig, um Beschädigungen der umgebenden Farbe zu vermeiden
- Lagern Sie Reparaturmaterialien zwischen -2°C und 45°C für beste Leistung
5. Warum ein komplettes Trockenbau-Reparaturset wählen?
Die Verwendung eines All-in-One-Sets wie dem SEISSO Trockenbau-Reparaturset bietet mehrere Vorteile:
- ✔ Zeitsparend – Alles in einer Box enthalten
- ✔ Anfängerfreundlich – Keine Fachkenntnisse erforderlich
- ✔ Schnelle Trocknung – Reparaturen in Stunden fertig
- ✔ Langlebiges und glattes Finish – Wasserbeständig und langanhaltend
- ✔ Vielseitig einsetzbar – Funktioniert bei Rissen, Löchern, Flecken und abblätternden Wänden
Ob Sie kleine Nagellöcher oder größere Wandschäden reparieren, ein komplettes Set gewährleistet konsistente Ergebnisse.
6. Häufige Fehler bei der Trockenbau-Reparatur vermeiden
- Zu viel Spachtelmasse auf einmal auftragen
- Das Schleifen überspringen
- Die Oberfläche vorher nicht reinigen
- Den Trocknungsprozess überstürzen
Das Vermeiden dieser Fehler kann einen großen Unterschied im Endergebnis machen.
Die Reparatur von Trockenbauwänden muss nicht kompliziert oder teuer sein. Mit dem richtigen Ansatz und den richtigen Werkzeugen kann jeder beschädigte Wände wieder in einen neuwertigen Zustand versetzen.
Wenn Sie eine schnelle, effektive und anfängerfreundliche Lösung suchen, ist das SEISSO Trockenbau-Reparaturset eine ausgezeichnete Wahl für alles, von kleinen Ausbesserungen bis hin zu größeren Reparaturen.