Beschädigte Wände sind in jedem Haus ein häufiges Problem. Von Nagellöchern und Kratzern bis hin zu großen Rissen und Dellen können Unebenheiten in der Trockenbauwand Ihren Raum abgenutzt und unfertig aussehen lassen. Die gute Nachricht? Sie müssen keinen Fachmann beauftragen, um dies zu reparieren.
Mit dem richtigen Trockenbau-Reparaturset können Sie Ihre Wände im Handumdrehen in ein glattes, makelloses Finish verwandeln.
In diesem Leitfaden erfahren Sie alles, was Sie über die DIY-Trockenbau-Reparatur wissen müssen, einschließlich Werkzeugen, Techniken und Tipps, um professionelle Ergebnisse zu erzielen.
1. Was verursacht Trockenbau-Schäden?
Bevor Sie mit den Reparaturen beginnen, ist es wichtig, die häufigsten Ursachen für Wandschäden zu verstehen:
- Nagel- und Schraubenlöcher vom Aufhängen von Bildern
- Möbelstöße und versehentliche Stöße
- Risse durch Setzen des Hauses
- Kratzer und Dellen durch täglichen Verschleiß
- Kinderzeichnungen oder Wandflecken
Egal welches Problem, ein zuverlässiges Wandreparaturset kann Ihnen helfen, es schnell und effektiv zu beheben.
2. Was Sie für die Trockenbau-Reparatur benötigen
Um eine nahtlose Reparatur zu erzielen, ist das richtige Werkzeug unerlässlich. Ein komplettes Trockenbau-Flickenset enthält typischerweise:
- Wandspachtel oder Reparaturpaste
- Trockenbau-Flicken (verschiedene Größen)
- Reparaturband für Risse
- Schaber oder Spachtel
- Schleifpapier zum Glätten
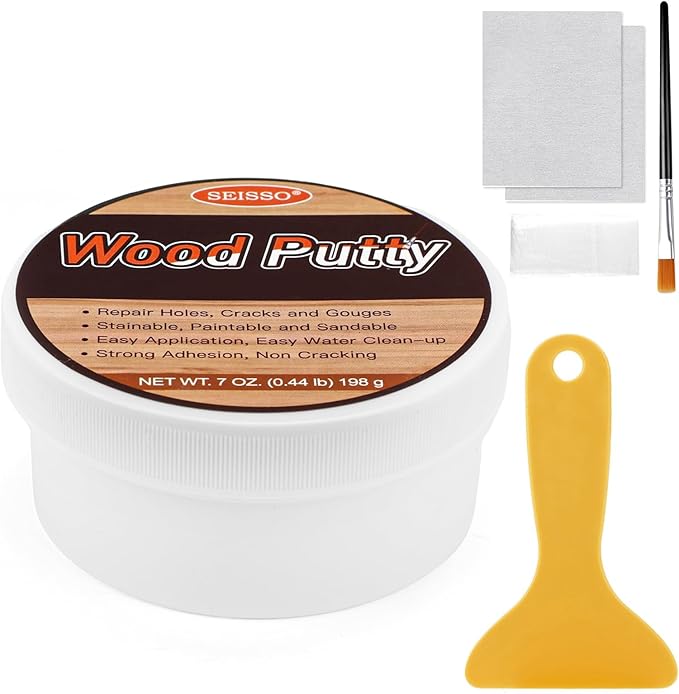
Ein gut ausgestattetes Set wie das SEISSO Trockenbau-Reparaturset bietet alles, was Sie benötigen, in einem Paket – ideal für Anfänger und Hausbesitzer gleichermaßen.
3. Schritt-für-Schritt-Anleitung zur Trockenbau-Reparatur
1). Kleine Löcher und Kratzer reparieren
Bei kleineren Schäden wie Nagellöchern oder kleinen Dellen:
- Reinigen Sie den beschädigten Bereich
- Tragen Sie Wandspachtel direkt in das Loch auf
- Verwenden Sie einen Schaber, um die Oberfläche zu glätten
- Lassen Sie es vollständig trocknen
- Leicht anschleifen für ein glattes Finish
Dies ist die einfachste Art der Wandlochreparatur und kann in wenigen Minuten durchgeführt werden.
2). Große Risse oder Löcher reparieren
Bei größeren Schäden befolgen Sie diese Schritte:
- Reinigen und trocknen Sie den beschädigten Bereich
- Bringen Sie einen Trockenbau-Flicken oder Reparaturband über dem Riss an
- Verteilen Sie die Reparaturpaste gleichmäßig auf der Oberfläche
- Glätten Sie sie mit einem Schaber
- Lassen Sie sie vollständig trocknen
- Schleifen Sie, bis sie glatt und eben ist
Diese Methode gewährleistet eine starke und dauerhafte Reparatur, insbesondere bei tieferen Rissen.
4. Tipps für ein perfektes Wand-Finish
- Tragen Sie dünne Schichten Spachtel für bessere Ergebnisse auf
- Lassen Sie jede Schicht vollständig trocknen, bevor Sie schleifen
- Verwenden Sie feinkörniges Schleifpapier für ein glattes Finish
- Passen Sie die Wandfarbe nach der Reparatur bei Bedarf an
- Arbeiten Sie in einem gut belüfteten Bereich
Die Verwendung hochwertiger Materialien kann einen großen Unterschied bei der Erzielung eines professionellen Aussehens machen.
5. Warum ein komplettes Trockenbau-Reparaturset wählen?
Anstatt Werkzeuge separat zu kaufen, spart ein komplettes Trockenbau-Reparaturset mit Flicken und Spachtel Zeit und Mühe. Es gewährleistet die Kompatibilität zwischen den Materialien und vereinfacht den Reparaturprozess.
Das SEISSO Trockenbau-Reparaturset wurde mit Blick auf Bequemlichkeit entwickelt. Es enthält:
- Mehrere Reparaturmaterialien für verschiedene Wandprobleme
- Einfach zu bedienende Werkzeuge für Anfänger
- Sichere und zuverlässige Inhaltsstoffe
- Glattes, natürlich aussehendes Finish nach dem Trocknen
Egal, ob Sie Risse, Löcher oder Kratzer haben, es ist eine praktische Lösung für alltägliche Reparaturen im Haushalt.
6. Häufige Fehler bei der Trockenbau-Reparatur, die Sie vermeiden sollten
- Zu viel Spachtel auf einmal auftragen
- Schleifen nach dem Trocknen überspringen
- Die Wand vor der Reparatur nicht reinigen
- Die falsche Flickengröße verwenden
- Den Trocknungsprozess überstürzen
Das Vermeiden dieser Fehler hilft Ihnen, ein saubereres und länger haltbares Ergebnis zu erzielen.
Das Erlernen der Trockenbau-Reparatur ist eine wertvolle Fähigkeit, die sowohl Zeit als auch Geld spart. Mit dem richtigen Ansatz und einem zuverlässigen Wandreparatur-Flickenset können Sie die meisten Wandschäden selbst beheben.
Wenn Sie nach einer einfachen All-in-One-Lösung suchen, bietet das SEISSO Trockenbau-Reparaturset alles, was Sie benötigen, um Ihre Wände schnell und effizient zu restaurieren.