Beschädigte Wände gehören zu den häufigsten Problemen im Haushalt – ob Nagellöcher, Risse, Dellen oder versehentliche Schäden. Die gute Nachricht? Sie müssen keinen Fachmann beauftragen, um sie zu reparieren.
Mit dem richtigen Trockenbau-Reparaturset können Sie Ihre Wände schnell, sauber und kostengünstig wiederherstellen.
In diesem Leitfaden zeigen wir Ihnen Schritt für Schritt, wie Sie Trockenbau-Löcher reparieren – und welche Werkzeuge die Arbeit erleichtern.
1. Häufige Arten von Trockenbauschäden (und wie man sie behebt)
Bevor Sie beginnen, ist es wichtig zu verstehen, um welche Art von Wandschäden es sich handelt:
1). Kleine Löcher (Nagellöcher & Stifte)
Diese sind am einfachsten zu reparieren und erfordern nur Wandreparaturpaste (Spachtelmasse).
2). Mittlere Löcher (Dellen & Kratzer)
Sie benötigen eine Kombination aus Spachtelmasse + Schleifen für ein glattes Finish.
3). Große Löcher oder Risse
Für größere Schäden ist ein Trockenbau-Reparaturset unerlässlich, um den Bereich vor dem Auftragen von Füllmaterial zu verstärken.
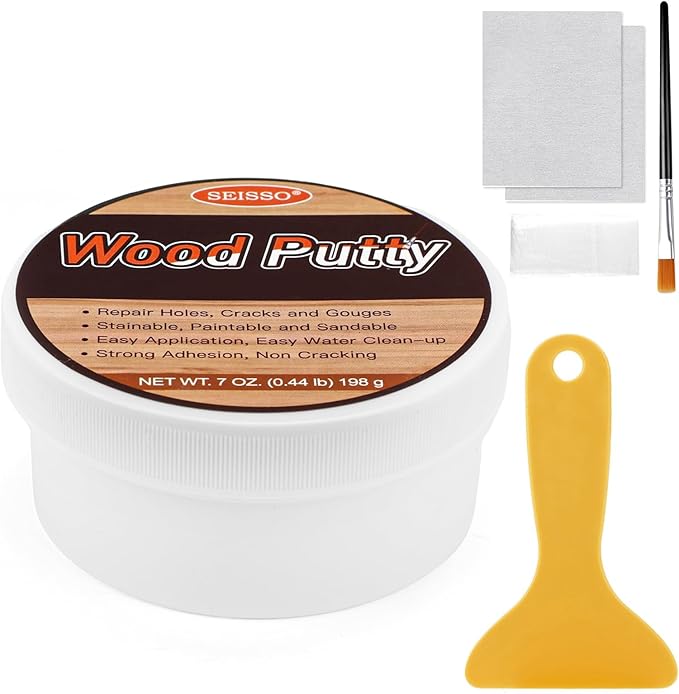
2. Was Sie brauchen: Wichtige Werkzeuge für die Trockenbau-Reparatur
Um Trockenbau ordnungsgemäß zu reparieren, ist ein komplettes Werkzeugset unerlässlich. Ein typisches Wandreparaturset sollte Folgendes enthalten:
- Wandausbesserungsmittel (Spachtelmasse)
- Selbstklebende Reparaturflicken
- Schaber oder Spachtel
- Schleifpapier zum Glätten
- Präzisionsdüsen für kontrolliertes Auftragen
Die Verwendung eines All-in-One-Trockenbau-Reparatursets spart Zeit und gewährleistet gleichbleibende Ergebnisse – insbesondere für Anfänger.
3. Schritt für Schritt: So reparieren Sie ein Trockenbau-Loch
Schritt 1: Reinigen Sie den beschädigten Bereich
Wischen Sie die Wand mit einem trockenen oder leicht feuchten Tuch ab, um Staub und Schmutz zu entfernen. Dies hilft dem Füllmaterial, besser zu haften.
Schritt 2: Tragen Sie die Reparaturlösung auf
Für kleine Löcher:
- Tragen Sie Spachtelmasse direkt in das Loch auf und glätten Sie es mit einem Schaber
- Für große Löcher oder Risse:
- Bringen Sie zuerst einen selbstklebenden Trockenbau-Flicken über dem beschädigten Bereich an
- Danach mit Wandreparaturpaste abdecken
Schritt 3: Glätten Sie die Oberfläche
Verwenden Sie einen Schaber, um die Oberfläche gleichmäßig zu glätten. Machen Sie sich keine Sorgen, wenn es nicht perfekt ist – dies wird später verfeinert.
Schritt 4: Lassen Sie es trocknen
Die meisten schnell trocknenden Trockenbau-Reparaturmassen trocknen innerhalb weniger Stunden, je nach Temperatur und Belüftung.
Schritt 5: Schleifen und Fertigstellen
Nach dem Trocknen den Bereich vorsichtig glatt schleifen. Staub abwischen, und Ihre Wand ist bei Bedarf bereit zum Streichen.
4. Profi-Tipps für ein perfektes Wand-Finish
- Tragen Sie dünne Schichten statt einer dicken Schicht auf
- Schleifen Sie immer leicht, um ungleichmäßige Oberflächen zu vermeiden
- Sorgen Sie vor dem nächsten Schritt für eine ordnungsgemäße Trocknung
- Passen Sie die Farbe nach der Reparatur für ein nahtloses Aussehen an
5. Warum ein komplettes Trockenbau-Reparaturset einen Unterschied macht
Viele DIY-Reparaturen scheitern an fehlenden Werkzeugen oder minderwertigen Materialien. Ein gut durchdachtes Trockenbau-Reparaturset mit Flicken und Spachtel vereinfacht den gesamten Prozess.
Anstatt Werkzeuge separat zu kaufen, gewährleistet ein All-in-One-Kit:
- Bessere Haftung und Haltbarkeit
- Schnellere Reparaturen mit weniger Unordnung
- Gleichmäßige, professionell aussehende Ergebnisse
Zum Beispiel erleichtern Kits, die mehrere Flickengrößen, Schleifwerkzeuge und Präzisionsapplikatoren enthalten, die Handhabung von winzigen Nagellöchern bis zu größeren Rissen in einem Arbeitsgang.
6. Eine intelligentere DIY-Lösung für Wandreparaturen
Wenn Sie eine einfache und effiziente Möglichkeit suchen, Wandschäden zu beheben, kann die Wahl eines kompakten und kompletten Trockenbau-Reparatursets sowohl Zeit als auch Mühe sparen.
Produkte, die mit schnell trocknenden Formeln, starker Haftung und einfachen Anwendungswerkzeugen entwickelt wurden, sind besonders hilfreich für Anfänger, die saubere, zuverlässige Ergebnisse ohne komplizierte Schritte erzielen möchten.
Deshalb bevorzugen viele Hausbesitzer gebrauchsfertige Kits, die Wandreparaturpaste, Flicken, Schaber und Schleifwerkzeuge kombinieren – was die Reparaturen jederzeit erleichtert.
7. Abschließende Gedanken
Die Reparatur von Trockenbau muss nicht kompliziert sein. Mit dem richtigen Ansatz und den richtigen Werkzeugen kann jeder Wandschäden schnell und effektiv beheben.
Ob es sich um ein kleines Nagelloch oder einen größeren Riss handelt, die Verwendung eines hochwertigen Trockenbau-Reparatursets hilft Ihnen:
- Ihre Wände einfach wiederherzustellen
- Geld bei professionellen Reparaturen zu sparen
- Ihr Zuhause sauber und gepflegt aussehen zu lassen
Beginnen Sie mit den Grundlagen, befolgen Sie die Schritte, und Sie werden überrascht sein, wie professionell Ihre Wände aussehen können.